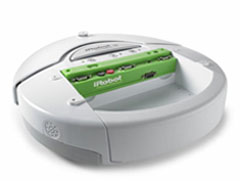
HamsterBot 1.0 was successfully demoed today. This post documents the details of our implementation...
Physical Design
Our final robot consists of a hamsterball, a roomba, a styrofoam ring, and a little duct tape. The ring is wrapped in teflon tape and mounted on two "feet" (empty teflon tape containers) which are then duct taped on either side of the cargo bay of the roomba. A motion sensor is then placed in the cargo bay (stabilized by some foam bedding) and the hamsterball is set inside the ring, such that its bottom surface rests on the sensor. The ring and sensor are sufficiently smooth to allow the ball to rotate freely in place in any direction.
Mouse Motion Sensing
Inspired by the video of iRobot's hamsterbot, we chose a wireless optical mouse as our motion sensor. The pyRoomba software used for various class assignments served as a basis for our program. The graphics code included therein utilized the Tkinter module and included functions for determining the cursor position (as long as it is over the canvas). I extended this code to include data members for the cursor position and to update these data members whenever mouse motion was detected.
Our Program
I then added a "Mouse Mode" to the pyRoomba main program where the cursor position is checked at regular intervals. If a change in position occurs, the robot's linear and angular velocities are set to be proportional to the vertical and horizontal displacements, respectively, between the starting and ending points of the movement. Thus, moving the cursor upward via the mouse causes forward motion, while moving it to the left causes the robot to turn toward the left, etc....
This motion model is basically what one would expect in order to steer the roomba with a mouse as one would normally use the mouse (that is, on the table, with the sensor facing down). Within Mouse Mode, we can also toggle on and off "Hamster Mode". Since the mouse sits upside down, with the hamsterball "rolling" in place over the sensor, this switch simply flips the sign of the angular velocity used. i.e., If it looks like the mouse is moving left under hamsterball control, the ball must actually be rolling toward the right, so we turn towards the right.
The ctypes python module provides a function that will set the position of the cursor to any point on the screen, which ensured that we would not "run out of screen" as described in the previous post, since we can just place the cursor back in the center of the screen after each motion sampling.
Future Work
There are still a couple issues that could be improved upon with this system. The first is that the hardware could be nicer. The styrofoam ring is not very durable and doesn't always keep the ball centered over the mouse sensor. It also allows the ball (and thus, the cursor) to wobble back a forth slightly due to changes in velocity, which is a kind of motion that it would be nice to ignore, if not eliminate.
Secondly, the robot's motions resulting from mouse movements are somewhat jerky. Part of this is due to the ball wobbling in the ring as described above, but a human hand can create the same effect. If the mouse or ball is moved quickly forward and back, the robot's linear velocity will change direction so abruptly that it will pop a wheely! This looks cool to an observer, but would probably not be very fun for a hamster. Thus, our motions could definitely use some smoothing. Forcing each sampled motion to run for a minimum time, or causing changes in velocity to occur more gradually are two possible approaches to this end.
Tuesday, March 6, 2007

Wednesday, February 21, 2007
Problems with PyHook and Tk
Hamsterbot requires that we convert mouse motion into differential drive motion.
Both the pyHook and Tkinter provide ways of monitoring cursor movements, so by modifying our pyRoomba code, we can now get an updated position of the cursor (such that the origin at the center of the map, and only when the mouse is over the map with no other windows between them) at each loop. There are many different ways we could use this information to adjust our linear and angular velocities, but I think one of the following should be both simple and effective for a first try:
1. Start the cursor position at the center of the screen. Keep track of the previous cursor position. Upon detecting movement, get the new cursor position.
"Draw" a ray from the previous position to the new position and a vertical line through the previous position. If the angle between the line and the ray is within some (possibly large) tolerance of 0, go straight forward. Within tolerance of 180: go backwards. Otherwise circle forwards or backwards and left or right based on which way the ray points.
Problem with 1: The cursor position is bound within the map. We cannot make the robot go forward for an arbitrary distance using the physical mouse because the cursor effectively encounters a wall at the edge of the map. Also, if the cursor moves off the map some distance, it has to be moved back that distance before the robot will pick up the motion again. We can solve this last problem by maximizing the map, but then we are still bound within the screen. However, we might be able to scale our screen to an arbitrarily large (or small) physical area by slowing the cursor speed via the OS. In fact, increasing the cursor speed should confine hamsterbot to a smaller area, like putting up an invisible fence.
2. Start the cursor at the center of the screen. Upon detecting movement, get the new position and do as in #1, but then reset the mouse position to the center of the screen. That way we never run out of screen. (At least one or both pyHook and Tk offer ways of checking if a mouse move was 'injected' by a program rather than coming from the actual device, so we won't count the resetting of the positiong as a movement.)
Problem with 2: Neither pyHook nor Tk nor any other package I can find seems to offer a way of injecting Windows mouse events in python.
Both the pyHook and Tkinter provide ways of monitoring cursor movements, so by modifying our pyRoomba code, we can now get an updated position of the cursor (such that the origin at the center of the map, and only when the mouse is over the map with no other windows between them) at each loop. There are many different ways we could use this information to adjust our linear and angular velocities, but I think one of the following should be both simple and effective for a first try:
1. Start the cursor position at the center of the screen. Keep track of the previous cursor position. Upon detecting movement, get the new cursor position.
"Draw" a ray from the previous position to the new position and a vertical line through the previous position. If the angle between the line and the ray is within some (possibly large) tolerance of 0, go straight forward. Within tolerance of 180: go backwards. Otherwise circle forwards or backwards and left or right based on which way the ray points.
Problem with 1: The cursor position is bound within the map. We cannot make the robot go forward for an arbitrary distance using the physical mouse because the cursor effectively encounters a wall at the edge of the map. Also, if the cursor moves off the map some distance, it has to be moved back that distance before the robot will pick up the motion again. We can solve this last problem by maximizing the map, but then we are still bound within the screen. However, we might be able to scale our screen to an arbitrarily large (or small) physical area by slowing the cursor speed via the OS. In fact, increasing the cursor speed should confine hamsterbot to a smaller area, like putting up an invisible fence.
2. Start the cursor at the center of the screen. Upon detecting movement, get the new position and do as in #1, but then reset the mouse position to the center of the screen. That way we never run out of screen. (At least one or both pyHook and Tk offer ways of checking if a mouse move was 'injected' by a program rather than coming from the actual device, so we won't count the resetting of the positiong as a movement.)
Problem with 2: Neither pyHook nor Tk nor any other package I can find seems to offer a way of injecting Windows mouse events in python.
Wednesday, February 7, 2007
Programs, Python and Photographs

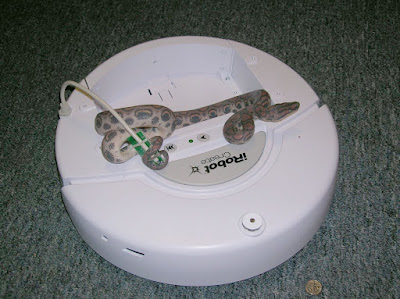
Today Lilia and I successfully wrote a simulator for our dear Roomba which navigates a small room and seeks out a goal. This program is written in Python and runs on my laptop, which communicates the proper movements to the Roomba via a Bluetooth radio, which is the chip seen in the picture.
Indeed, we tried to test this program out on our Roomba. Unfortunately, we discovered that Roombas tend to not work so well when you don't have them charged. As a result, the only video of our progress so far is this one. Just wait, better things will come very soon!
Until we get some cool videos up, you will have to be content with the ever-fearsome, Snakes on Roombas!
Friday, February 2, 2007
Remote Control Roomba
Today we got the pyRoomba python code working on Scott's laptop. We also obtained a bluetooth radio for our roomba so that it can be controlled remotely through python scripts or the command prompt.
Our next objective is to capture some images and/or video of the roomba in action. We are also trying to think of an alternate name for our roomba, to distinguish it from other roombas...
We will also start working on the next step towards Hamsterbot: writing Python code to capture wireless optical mouse data and convert it into pyRoomba commands.
Our next objective is to capture some images and/or video of the roomba in action. We are also trying to think of an alternate name for our roomba, to distinguish it from other roombas...
We will also start working on the next step towards Hamsterbot: writing Python code to capture wireless optical mouse data and convert it into pyRoomba commands.
Wednesday, January 31, 2007
Up and Running
After several downloads and more than a few pages of manuals, the Roomba Create has successfully run a simple program and been connected to a computer!
Courtesy of the Create manuals page, we were able to download tools which allow us to write basic programs in C, compile them, and then transfer this compiled code over to the Roomba.
So far, deciphering the example code has proven to be tricky, but soon enough of it will be understood to create a sample program. The goals of this sample program will be testing the Roomba's mobility and sensor outputs.
Courtesy of the Create manuals page, we were able to download tools which allow us to write basic programs in C, compile them, and then transfer this compiled code over to the Roomba.
So far, deciphering the example code has proven to be tricky, but soon enough of it will be understood to create a sample program. The goals of this sample program will be testing the Roomba's mobility and sensor outputs.
Monday, January 29, 2007
How to Read this Blog
This blog serves as a website conforming to the guidelines given in HW2 for a technical report documenting a lab project for CS154.
The front page consists of a blog of all posts made on the site, making it extremely fast and easy to see if anything new has been added (although older posts may be edited here and there without notice). This includes everything from progress reports to background information to media. However, there is no gaurantee that individual posts will be related to those around them. In fact, the opposite is far more likely.
For a more cohesive reading experience, try navigating through the various Sections seen in the sidebar. For now, these are either links to particular posts (like this one) or to collections of related posts.
The front page consists of a blog of all posts made on the site, making it extremely fast and easy to see if anything new has been added (although older posts may be edited here and there without notice). This includes everything from progress reports to background information to media. However, there is no gaurantee that individual posts will be related to those around them. In fact, the opposite is far more likely.
For a more cohesive reading experience, try navigating through the various Sections seen in the sidebar. For now, these are either links to particular posts (like this one) or to collections of related posts.
Introduction
In the beginning, there was dirt. So iRobot created the Roomba, a robotic vacuuming system. But then the roboticists got excited and started fiddling with their Roombas, so iRobot created the Create...
This is the "Introduction" section post. It needs to be edited and made better, stronger, faster...
This is the "Introduction" section post. It needs to be edited and made better, stronger, faster...
Subscribe to:
Posts (Atom)